Tag Reference
What is a tag?
A tag is a generic term for a language element descriptor. The set of tags for a document or other unit of information is sometimes referred to as markup, a term that dates to pre-computer days when writers and copy editors marked up document elements with copy editing symbols or shorthand. [1]
In uAdmin, there are two different types of tags: Meta Tags and Type Tags.
Meta Tags vs. Type Tags
Meta tags provide metadata about the uAdmin document that describes some aspect of the contents of a model structure.
Meta tags are used to add extra features on the fields initialized in the model structure. Each field can have multiple meta tags.
Example:
type (model_name) struct {
    uadmin.Model
    Name string `uadmin:"required;filter"`
}
As shown above, required and filter are used meta tags.
Type tags are used to specify what type of component should be displayed.
Type tags are used to implement the type of component on the fields initialized in the model structure. Unlike in meta tags, type tags can be called only once.
Example:
type (model_name) struct {
    uadmin.Model
    Icon string `uadmin:"image"`
}
| Meta Tags | Type Tags | |
|---|---|---|
Meta Tags
approval
A feature used to set an approval permission in the field
Structure:
`uadmin:"approval"`
Suppose you have “johndoe” account in the User model that is not an admin.
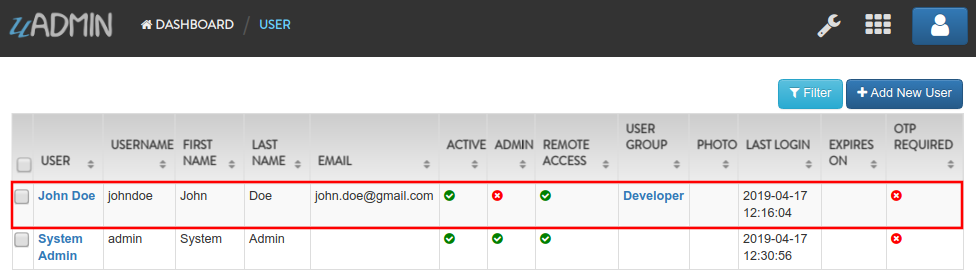
And you have user permissions for that user in Friends model without an approval access.
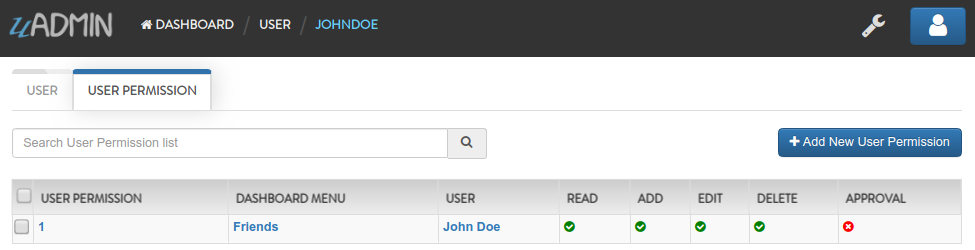
Open your Todo List project, go to the friend.go and set the approval tag in the Name field.
package models

import "github.com/uadmin/uadmin"

// Friend model ...
type Friend struct {
    uadmin.Model
    Name     string `uadmin:"approval"`
    Email    string
    Password string
}
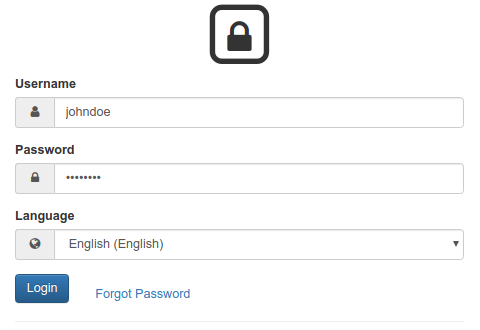
Run your application and login your account using “johndoe”.
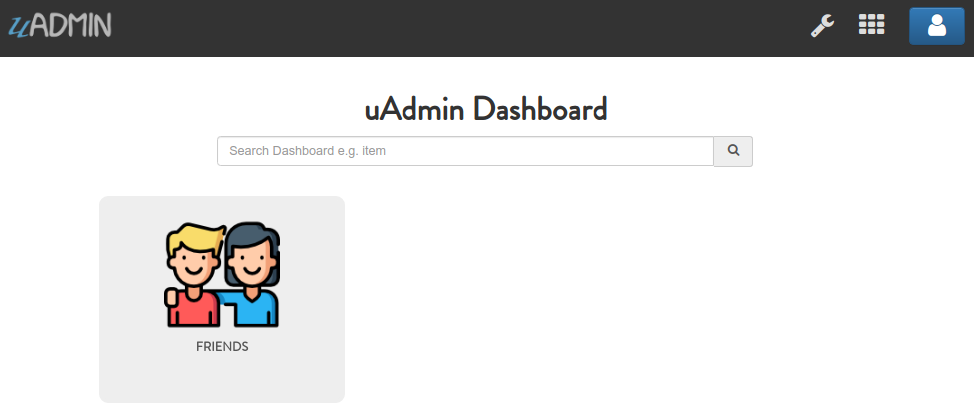
As you can see, only the Friends model is accessible in the dashboard. It is based on the user permission that was assigned on that user. Now click on “FRIENDS”.
Click “Add New Friend” to create a new record.

Let’s input the following field for this record.
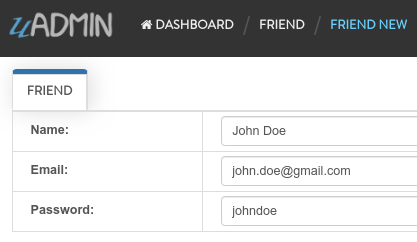
Result

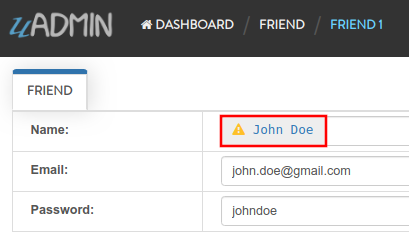
Based on the result, the name does not show up because we need an approval to someone who has approval access. Now logout johndoe account then login an admin account.
From uAdmin dashboard, go to the Friends model, click the record that you have created, and in the input box of the Name field, there is a yellow warning sign on the left side that means it needs an approval to someone who has approval access. Now click the highlighted area below.
The admin will review the record that was created by a “johndoe” user. If you think his record is satisfactory, choose Approved in Approval Action then click Save and Continue on the bottom right corner of the screen.
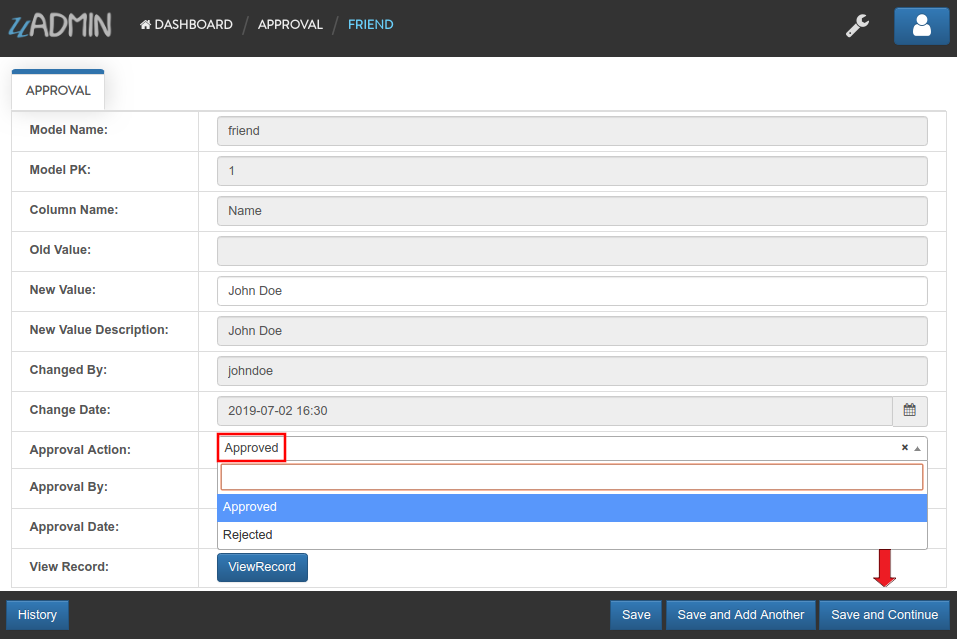
It is shown that the one who approved the record is an admin with an approved date. Now click View Record button to see the result.
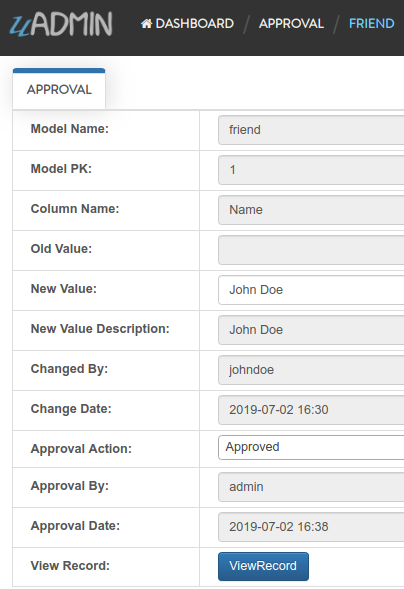
The input Name field has a checkmark sign that means the record created by “johndoe” was approved.

categorical_filter
A section of code that is designed to process user input and output request to produce a new data structure containing exactly those elements of the original data structure in the form of combo box
Structure:
`uadmin:"categorical_filter"`
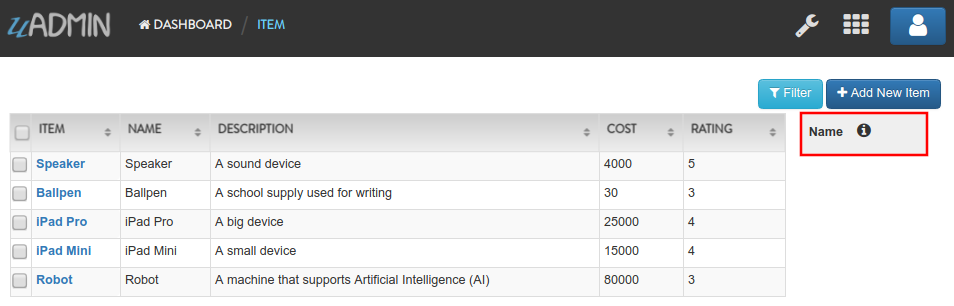
Open your Todo List project, go to the items.go and set the categorical_filter tag in the Name field.
package models

import "github.com/uadmin/uadmin"

// Item model ...
type Item struct {
    uadmin.Model
    Name        string `uadmin:"categorical_filter"`
    Description string
    Cost        int
    Rating      int
}
Let’s run the application to see the output.
default_value
Mainly used in the input field on which value you want to initialize. It is applicable only for string data type.
Structure:
`uadmin:"default_value"`
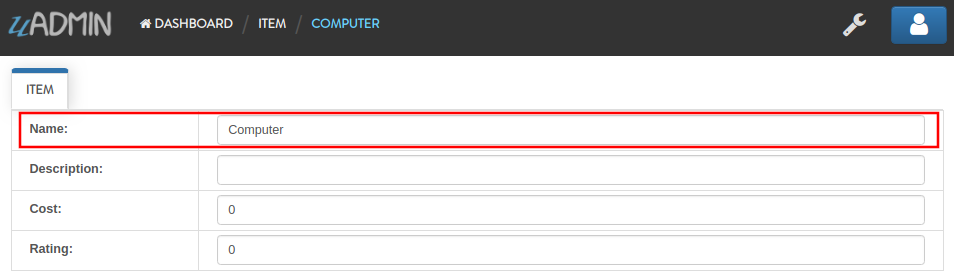
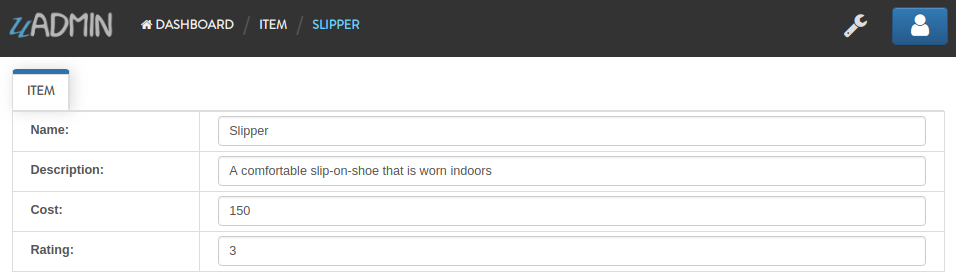
Open your Todo List project, go to the items.go and set the default_value tag in the Name field. Let’s say “Computer”.
package models

import "github.com/uadmin/uadmin"

// Item model ...
type Item struct {
    uadmin.Model
    Name        string `uadmin:"default_value:Computer"` // <-- place it here
    Description string
    Cost        int
    Rating      int
}
Let’s run the application to see the output.
display_name
A feature to set the actual name in the field
Structure:
`uadmin:"display_name"`
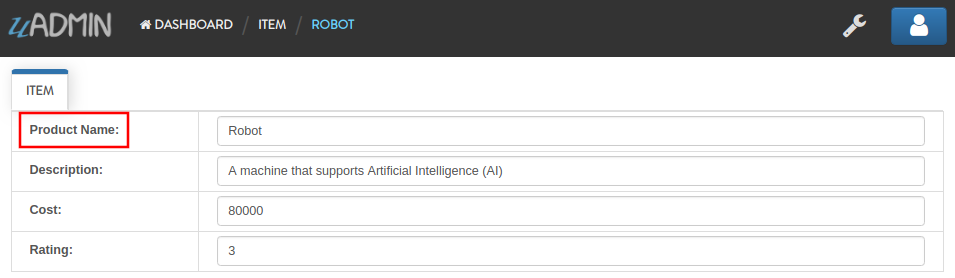
Open your Todo List project, go to the items.go and set the display_name tag in the Name field. Let’s say “Product Name”.
package models

import "github.com/uadmin/uadmin"

// Item model ...
type Item struct {
    uadmin.Model
    Name        string `uadmin:"display_name:Product Name"` // <-- place it here
    Description string
    Cost        int
    Rating      int
}
Let’s run the application to see the output.
encrypt
A feature used to encrypt the value in the database. It was released in version 0.1.0-beta.3.
Structure:
`uadmin:"encrypt"`
Add a record in the Friend model. Notice that the password you have inputed is 123456.

Go to the Friend model and apply the tag as “encrypt” in the Password field.
// Friend model ...
type Friend struct {
uadmin.Model
    Name     string
    Email    string
    Password string `uadmin:"encrypt"` // <- place it here
}
Now rerun your application, refresh your browser and see what happens.

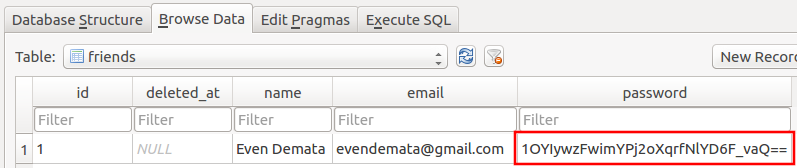
The password is invisible now. Go to your project folder, open uadmin.db file, go to Browse Data tab, and you will notice that the password field is encrypted.
Remove the encrypt tag in the Friend model, rerun your application and see what happens.
The password is shown again which means it is decrypted.
filter
A section of code that is designed to process user input and output request to produce a new data structure containing exactly those elements of the original data structure in the form of fill-up text
Structure:
`uadmin:"filter"`
Open your Todo List project, go to the item.go and set the filter tag in the Name field.
package models

import "github.com/uadmin/uadmin"

// Item model ...
type Item struct {
    uadmin.Model
    Name        string `uadmin:"filter"` // <-- place it here
    Description string
    Cost        int
    Rating      int
}
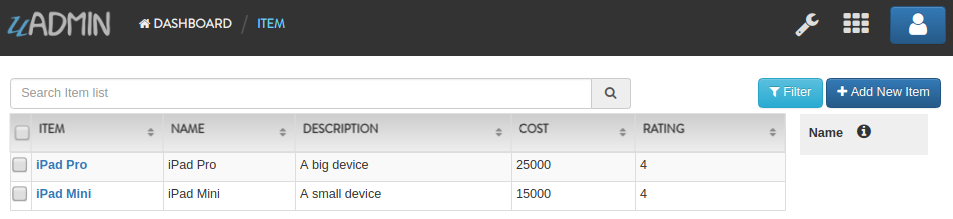
Run your application. Click the filter button on the upper right.
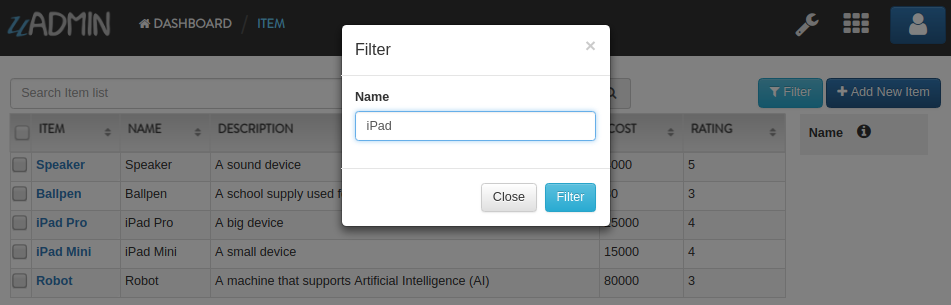
Now let’s filter the word “iPad” and see what happens.
help
A feature that gives solution(s) to solve advanced tasks
Structure:
`uadmin:"help"`
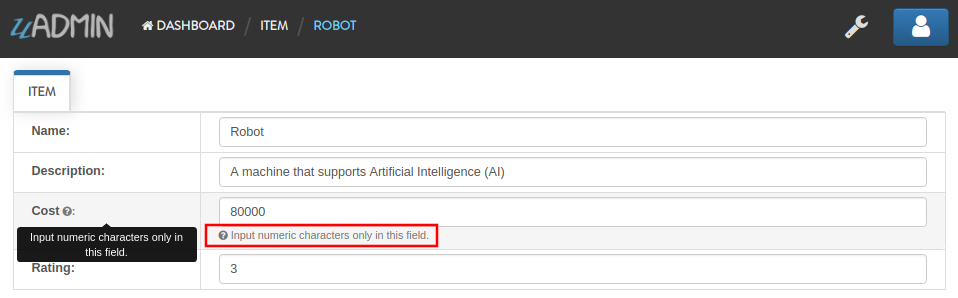
Open your Todo List project, go to the item.go and set the help tag in the Name field. Let’s say “Input numeric characters only in this field.”.
package models

import "github.com/uadmin/uadmin"

// Item model ...
type Item struct {
    uadmin.Model
    Name        string
    Description string
    Cost        int `uadmin:"help:Input numeric characters only in this field."` // <-- place it here
    Rating      int
}
Let’s run the application to see the output.
list_exclude
A feature that will hide the field or column name in the model structure
Structure:
`uadmin:"list_exclude"`
Open your Todo List project, go to the friend.go and set the list_exclude tag in the Password field.
package models

import "github.com/uadmin/uadmin"

// Friend model ...
type Friend struct {
    uadmin.Model
    Name     string
    Email    string
    Password string `uadmin:"list_exclude"` // <-- place it here
}
Let’s run the application to see the output.

Password does not show up in the model structure because it is set as “list_exclude”.
max
Mainly used in the input field to set the maximum value
Structure:
`uadmin:"max"`
Open your Todo List project, go to the item.go and set the max tag in the Rating field. Let’s say 5.
package models

import "github.com/uadmin/uadmin"

// Item model ...
type Item struct {
    uadmin.Model
    Name        string
    Description string
    Cost        int
    Rating      int `uadmin:"max:5"` // <-- place it here
}
Let’s run the application to see the output.

It returns an error because the value is greater than 5 which is the maximum value allowed.
min
Mainly used in the input field to set the minimum value
Structure:
`uadmin:"min"`
Open your Todo List project, go to the item.go and set the min tag in the Rating field. Let’s say 1.
package models

import "github.com/uadmin/uadmin"

// Item model ...
type Item struct {
    uadmin.Model
    Name        string
    Description string
    Cost        int
    Rating      int `uadmin:"min:1"` // <-- place it here
}
Let’s run the application to see the output.

It returns an error because the value is lesser than 1 which is the minimum value allowed.
pattern
Equivalent to regular expression that describes a pattern of characters
Structure:
`uadmin:"pattern:(regexp)"`
Open your Todo List project, go to the item.go and set the pattern tag in the Cost field. Let’s say ^[0-9]*$. This accepts numeric characters only.
package models

import "github.com/uadmin/uadmin"

// Item model ...
type Item struct {
    uadmin.Model
    Name        string
    Description string
    Cost        int `uadmin:"pattern:^[0-9]*$"` // <-- place it here
    Rating      int
}
Let’s run the application and see what happens.
Output
pattern_msg
Notifies the user once the input has been done following the given pattern
Structure:
`uadmin:"pattern_msg:(message)"`
Open your Todo List project, go to the item.go and set the pattern tag in the Cost field. Let’s say “Your input must be a number.”. This accepts numeric characters only.
package models

import "github.com/uadmin/uadmin"

// Item model ...
type Item struct {
    uadmin.Model
    Name        string
    Description string
    Cost        string `uadmin:"pattern:^[0-9]*$;pattern_msg:Your input must be a number."` // <-- place it here
    Rating      int
}
Let’s run the application and see what happens.
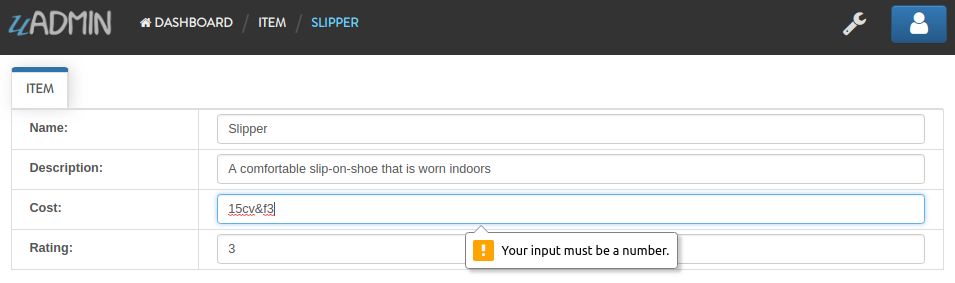
It returns an error because the input value has letters and special symbols.
read_only
A feature that cannot be modified
Structure:
`uadmin:"read_only"`
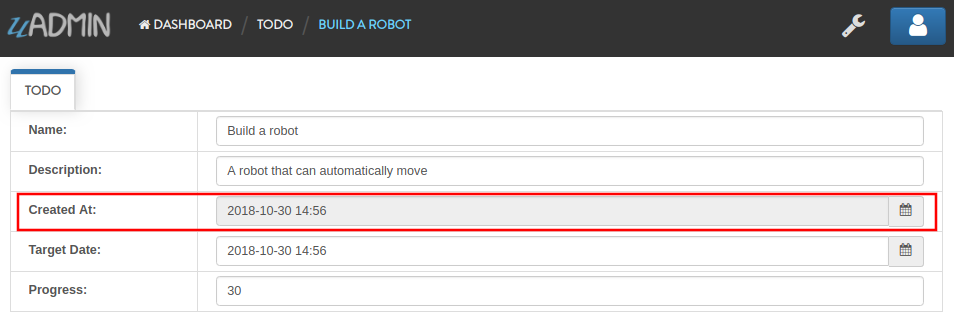
Open your Todo List project, go to the todo.go and set the read_only tag in the CreatedAt field.
package models

import (
    "time"
    "github.com/uadmin/uadmin"
)

// TODO model ...
type TODO struct {
    uadmin.Model
    Name        string
    Description string
    CreatedAt   time.Time `uadmin:"read_only"` // <-- place it here
    TargetDate  time.Time
    Progress    int
}
Let’s run the application to see the output.
required
A section of code that the user must perform the given tasks. It cannot be skipped or left empty.
Structure:
`uadmin:"required"`
Open your Todo List project, go to the category.go and set the required tag in the Name field.
package models

import "github.com/uadmin/uadmin"

// Category model ...
type Category struct {
    uadmin.Model
    Name string `uadmin:"required"` // <-- place it here
    Icon string
}
Let’s run the application to see the output.
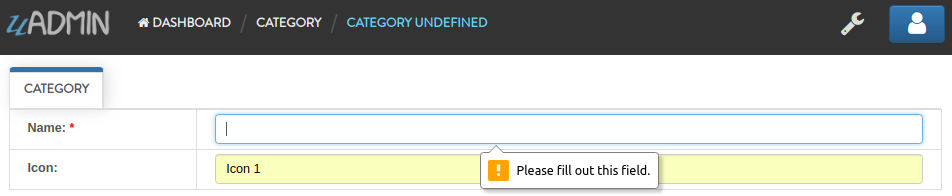
It returns an error because the input value is empty. * symbol indicates that the Name field is required to fill up.
search
A feature that allows the user to search for a field or column name
Structure:
`uadmin:"search"`
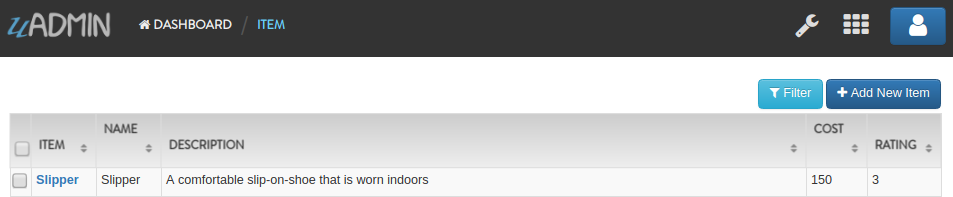
Before we proceed, add more data in your items model. Once you are done, let’s add the “search” tag in the name field of items.go and see what happens.
package models

import "github.com/uadmin/uadmin"

// Items model ...
type Items struct {
        uadmin.Model
        Name        string `uadmin:"search"` // <-- place it here
        Description string
        Cost        int
        Rating      int
}
Result
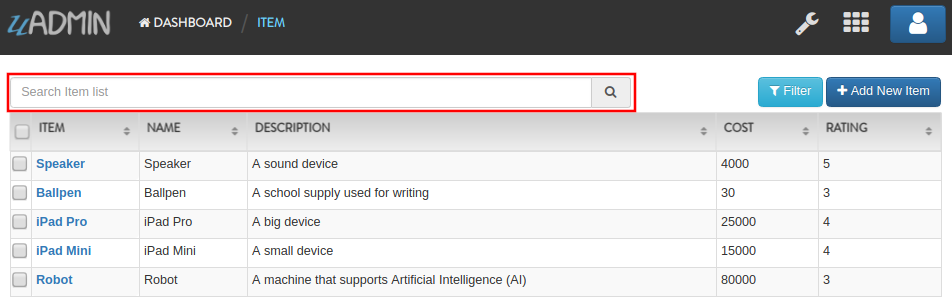
Search the word “mini” and see what happens.

stringer
A feature that assigns a field as a unique type
Structure:
`uadmin:"stringer"`
Open your Todo List project, go to friend.go inside the models folder, and apply the following codes below:
// Friend model ...
type Friend struct {
    uadmin.Model

    // Apply the stringer tag to show that this is the unique field
    // when we fetch data to the API
    Name     string `uadmin:"stringer"`

    Email    string
    Password string
}
Go to uadmin.Stringer in the API Reference for the continuation.
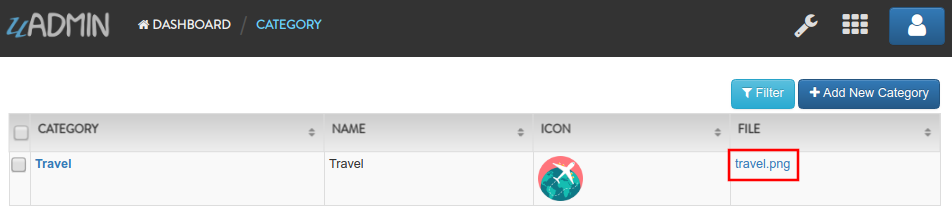
upload_to
A feature where the uploaded file will save in the specified path on your project folder
Structure:
`uadmin:"upload_to:(path)"`
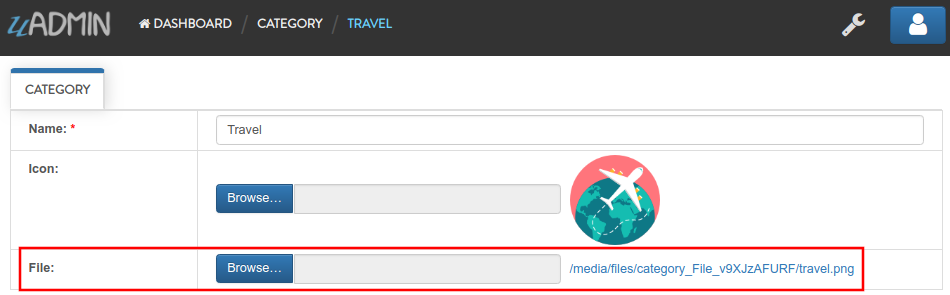
Open your Todo List project, go to category.go inside the models folder, and apply the following codes below:
// Category model ...
type Category struct {
    uadmin.Model
    Name string
    Icon string

    // Add this field with the type tag of file and assigned path in
    // upload_to
    File string `uadmin:"file;upload_to:/media/files/"`
}
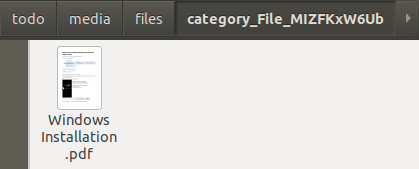
Run your application, go to the Category model and click Add New Category button on the top right corner of the screen. Let’s add a new record that includes the uploaded file from your computer (e.g. Windows Installation.pdf).
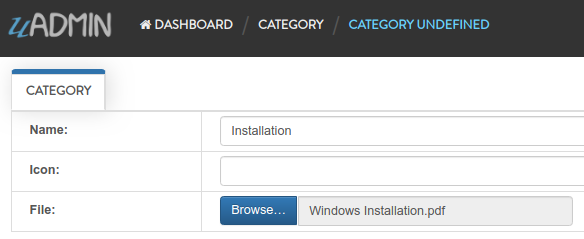
Result

From your project folder, go to /media/files/(generated_folder_name)/. As expected, the “Windows Installation.pdf” file was saved on that path.
Type Tags
code
A set of instructions that will be executed by a computer
Structure:
`uadmin:"code"`
Go to the friend.go and apply the following codes below:
// Friend model ...
type Friend struct {
    uadmin.Model
    Name     string `uadmin:"required"`
    Email    string `uadmin:"email"`
    Password string `uadmin:"password;list_exclude"`
    Message  string `uadmin:"code"`     // <-- place it here
}

// Save !
func (f *Friend) Save() {
    // Initialize two variables
    x := 5
    y := 3

    // Execution code. strconv.Itoa means converting from int to string.
    f.Message = "Hi, I'm " + f.Name + ". Can you solve " + strconv.Itoa(x) + " + " + strconv.Itoa(y) + " for me? The answer is " + strconv.Itoa(x+y) + "."

    // Override save
    uadmin.Save(f)
}
Now let’s run the application, go to the Friend model, create a record, save then let’s see the result.
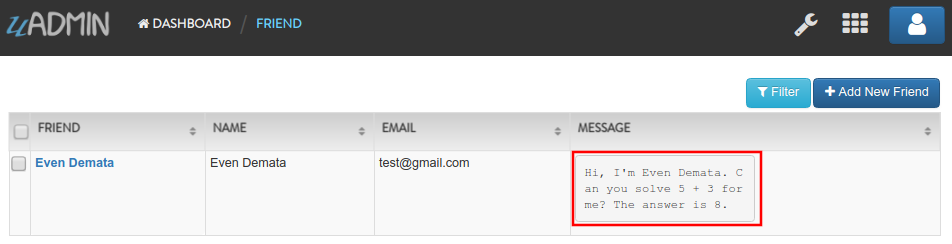
Well done! The execution code has performed successfully in the message field.
email
It identifies an email box to which email messages are delivered. It follows the format as follows: (name)@(domain).
e.g. abc123@gmail.com
Structure:
`uadmin:"email"`
Open your Todo List project, go to the friend.go and set the email tag in the Email field.
package models

import "github.com/uadmin/uadmin"

// Friend model ...
type Friend struct {
        uadmin.Model
        Name     string
        Email    string `uadmin:"email"` // <-- place it here
        Password string
}
Let’s run the application to see the output.
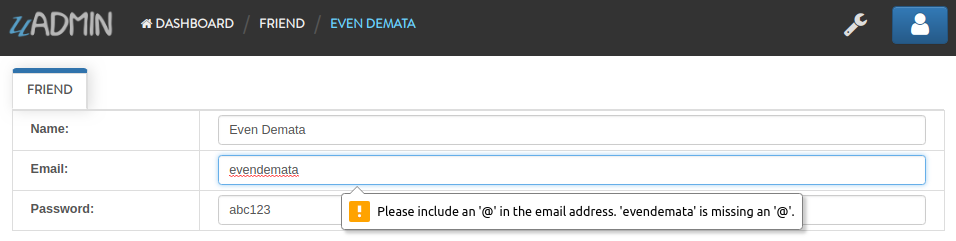
It returns an error because the input value does not follow the email format.
file
A tag that enables the user to upload files/attachments in the model
Structure:
`uadmin:"file"`
Go to the category.go and apply the following codes below:
package models

import "github.com/uadmin/uadmin"

// Category model ...
type Category struct {
    uadmin.Model
    Name string `uadmin:"required"`
    Icon string `uadmin:"image"`
    File string `uadmin:"file"` // <-- place it here
}
Now run your application. Go to the Category model. In File field, you can upload any type of files in the model.
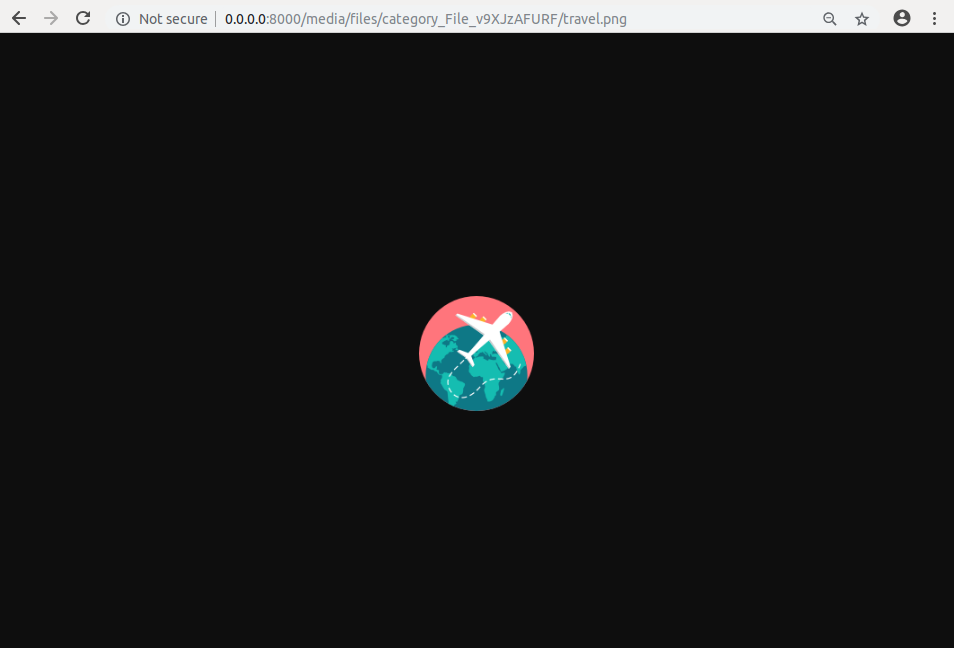
Now click the filename and see what happens.
Result
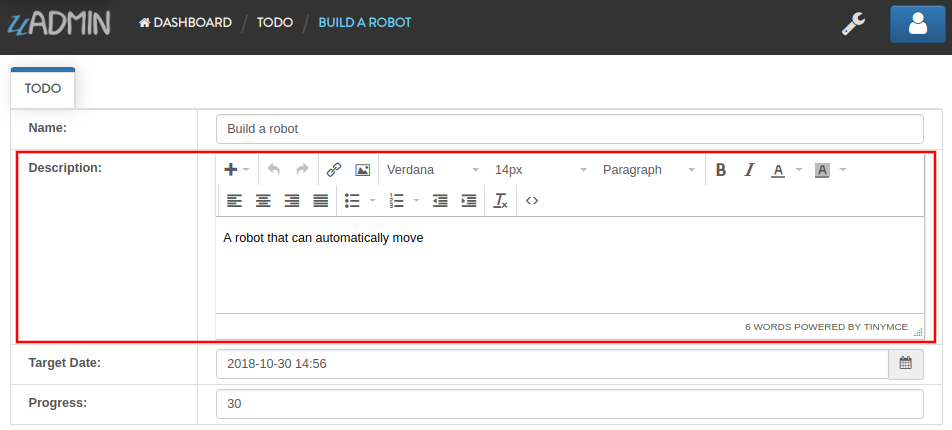
html
A tag that allows the user to modify text in HTML format
Structure:
`uadmin:"html"`
Open your Todo List project, go to the todo.go and set the html tag in the Description field.
package models

import (
    "time"
    "github.com/uadmin/uadmin"
)

// TODO model ...
type TODO struct {
    uadmin.Model
    Name        string
    Description string `uadmin:"html"` // <-- place it here
    TargetDate  time.Time
    Progress    int
}
Let’s run the application to see the output.
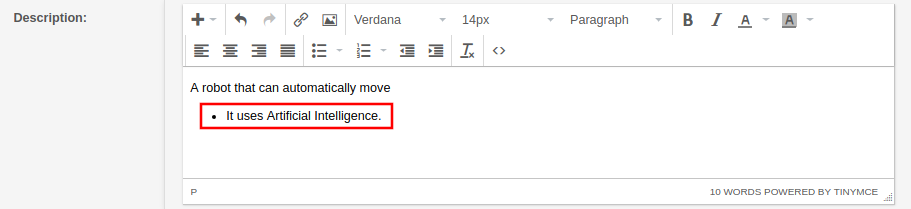
HTML has a source code feature that allows you to modify your own code through the application itself.
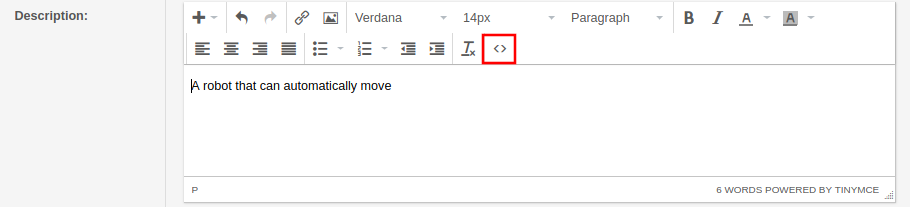
Add this piece of code in the source code editor. This will create a bulleted unordered list.
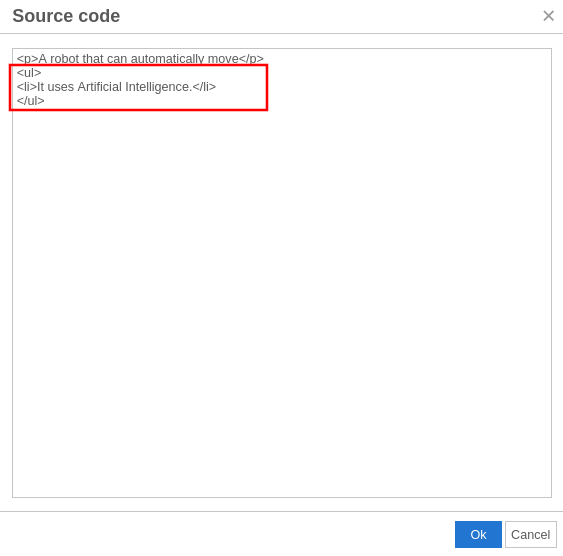
Result
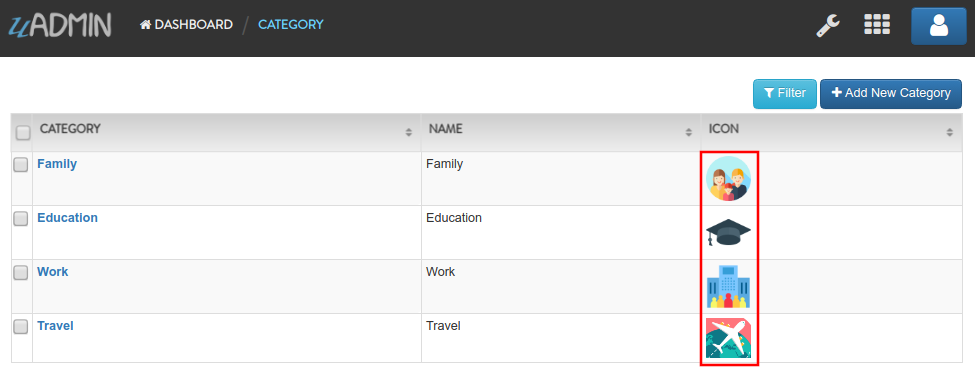
image
A tag to mark a field as an image
Structure:
`uadmin:"image"`
Open your Todo project. Go to your category.go in the models folder and let’s use the `uadmin:”image”` in the Icon field.
package models

import "github.com/uadmin/uadmin"

// Category model ...
type Category struct {
        uadmin.Model
        Name string `uadmin:"required"`
        Icon string `uadmin:"image"` // <-- place it here
}
To run your code:
$ cd ~/go/src/github.com/your_name/todo
$ go build; ./todo
[   OK   ]   Initializing DB: [13/13]
[   OK   ]   Synching System Settings: [51/51]
[   OK   ]   Server Started: http://127.0.0.1:8000
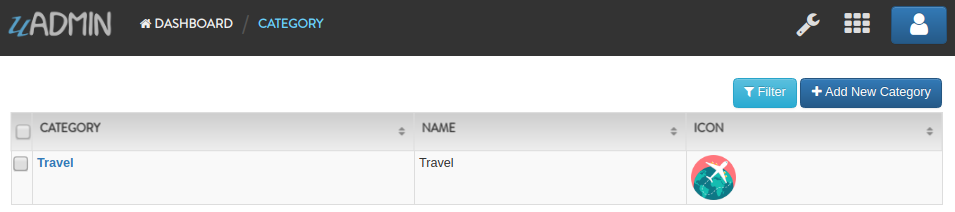
Let’s open the category model.
Create a new data in the category model. Press Save button below afterwards.
Result
uAdmin also allows you to crop your images.
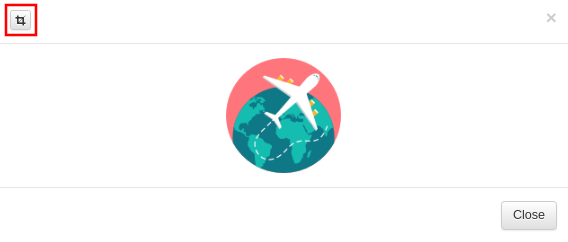
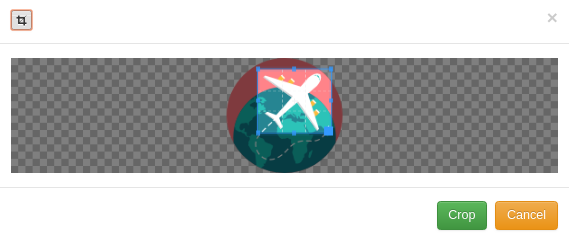
Once you are done, click the Crop button below and refresh the webpage to save your progress.
Your uploaded images are located in /media/images/(image_folder) path from your project folder by default.
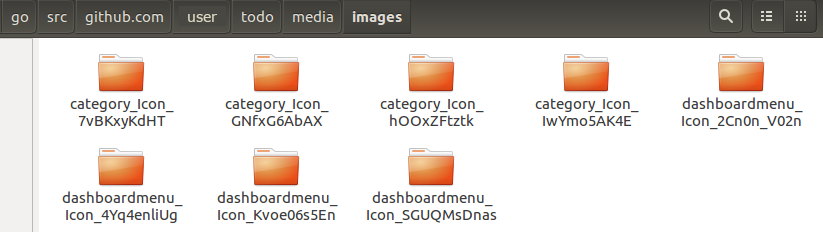
Every image folder has two images: Original and Raw files.

The raw images are the highlighted ones as shown below.
link
This type will display a button in the model.
Structure:
`uadmin:"link"`
Let’s add an Invite field in the friend.go that will direct you to his website. In order to do that, set the field name as “Invite” with the tag “link”.
// Friend model ...
type Friend struct {
    uadmin.Model
    Name        string
    Email       string
    Password    string
    Nationality string
    Invite      string `uadmin:"link"` // <-- place it here
}
To make it functional, add the overriding save function after the Friend struct.
// Save !
func (f *Friend) Save() {
    f.Invite = "https://www.google.com/"
    uadmin.Save(f)
}
Run your application, go to the Friends model and update the elements inside. Afterwards, click the Invite button on the output structure and see what happens.
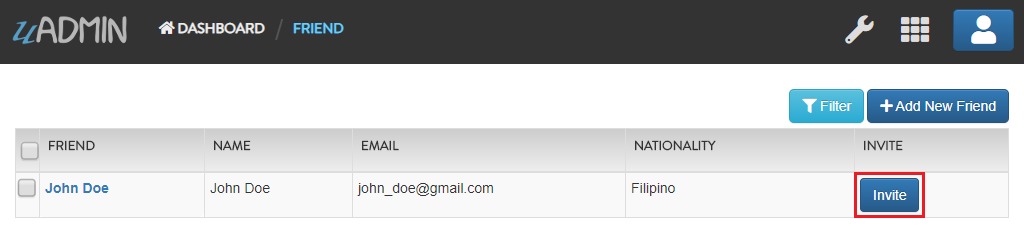
Result

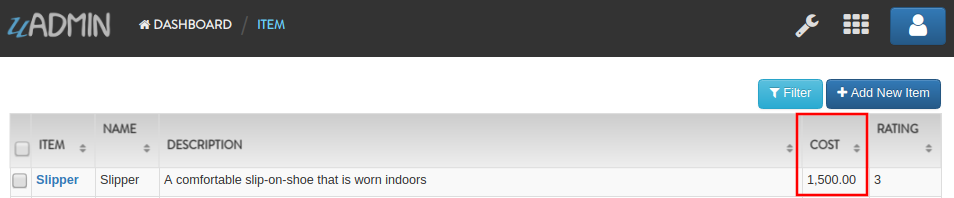
money
This will set the type of currency.
Structure:
`uadmin:"money"`
Open your Todo List project, go to the item.go and set the money tag in the Cost field.
package models

import "github.com/uadmin/uadmin"

// Item model ...
type Item struct {
    uadmin.Model
    Name        string
    Description string
    Cost        int `uadmin:"money"` // <-- place it here
    Rating      int
}
Let’s run the application and see what happens.
multilingual
A tag that allows the user to use more than two languages for input
Structure:
`uadmin:"multilingual"`
Open your Todo List project, go to the item.go and set the multilingual tag in the Description field.
package models

import "github.com/uadmin/uadmin"

// Item model ...
type Item struct {
    uadmin.Model
    Name        string
    Description string `uadmin:"multilingual"` // <-- place it here
    Cost        int
    Rating      int
}
Let’s run the application and see what happens.
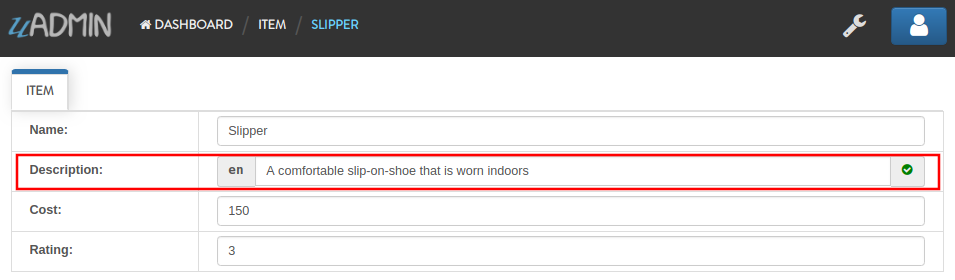
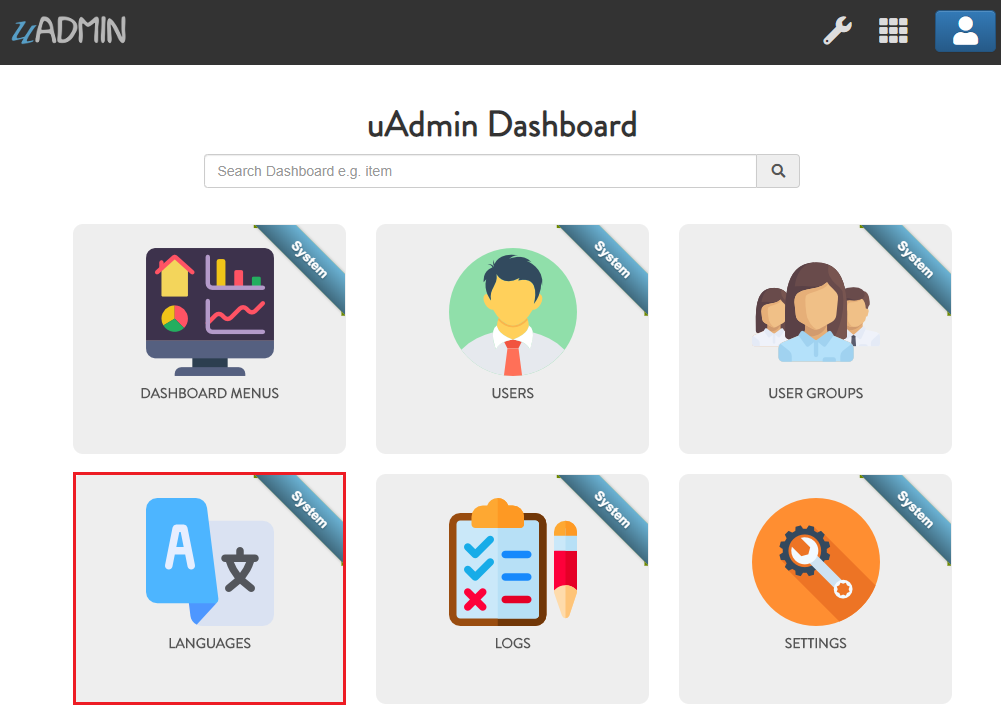
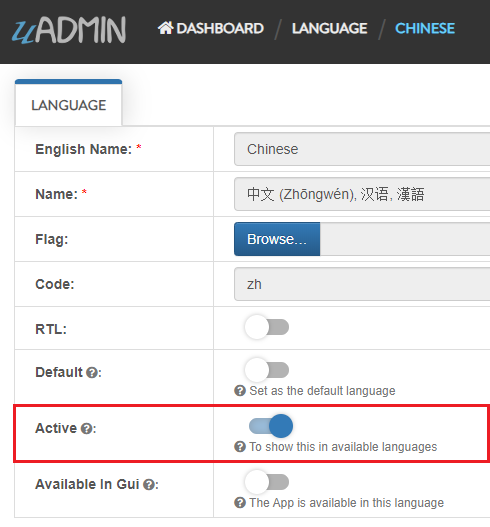
If you want to add more languages in your model, go to the Languages in the uAdmin dashboard.
Let’s say I want to add Chinese and Tagalog in the Item model. In order to do that, set the Active as enabled.
Now go back to the Item model and see what happens.
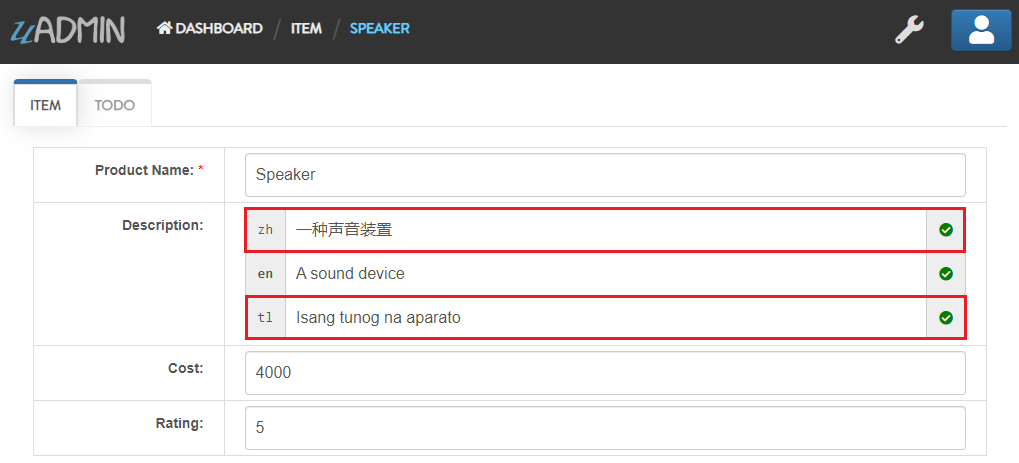
As expected, Chinese and Tagalog languages were added in the Description field.
To customize your own languages, click here for the instructions.
password
A string of characters that hides the input data for security
Structure:
`uadmin:"password"`
Open your Todo List project, go to the friend.go and set the password tag in the Password field.
package models

import "github.com/uadmin/uadmin"

// Friend model ...
type Friend struct {
    uadmin.Model
    Name     string
    Email    string
    Password string `uadmin:"password"` // <-- place it here
}
Let’s run the application to see the output.
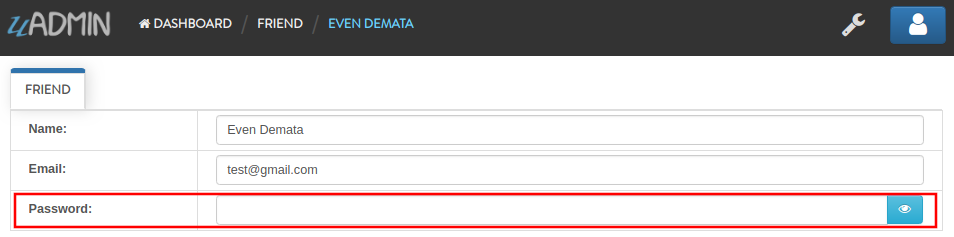
In this case, the string of characters will hide every time you input something in the password field. If you want to show your input, click the eye icon button on the right side highlighted above.
progress_bar
A feature used to measure the progress of the activity
Structure (default):
`uadmin:"progress_bar"` // Any number from 0 to 100 will display blue as the default color.
Structure (one parameter):
`uadmin:"progress_bar:100:orange"` // Any number from 0 to 100 will display orange color.
Structure (multiple parameters):
`uadmin:"progress_bar:40:red,70:yellow,100:green"` // Any number from 0 to 40 will display red color; 41 to 70 will display yellow color; 71 and above will display green color.
Open your Todo project. Go to your main.go and let’s use the default tag of the Progress field to `uadmin:”progress_bar”` inside the TODO struct.
Copy this code below:
Progress int `uadmin:"progress_bar"`
To the todo.go inside the models folder
package models

import (
        "time"
        "github.com/uadmin/uadmin"
)

// TODO model ...
type TODO struct {
        uadmin.Model
        Name        string
        Description string `uadmin:"html"`
        TargetDate  time.Time
        Progress    int `uadmin:"progress_bar"` // <-- place the tag here
}
To run your code:
$ cd ~/go/src/github.com/your_name/todo
$ go build; ./todo
[   OK   ]   Initializing DB: [13/13]
[   OK   ]   Synching System Settings: [51/51]
[   OK   ]   Server Started: http://127.0.0.1:8000
Let’s open the Todos model.
On the right side, click Add New Todo.

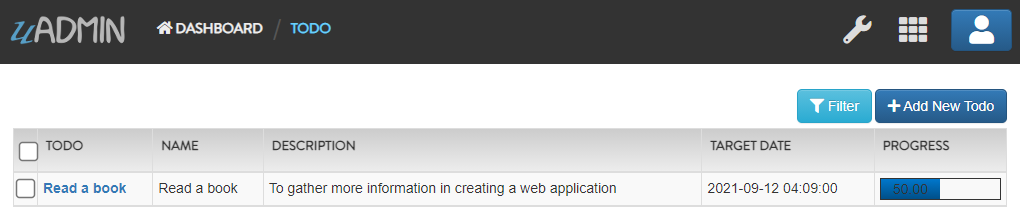
Input the progress value to 50 then let’s see what happens.
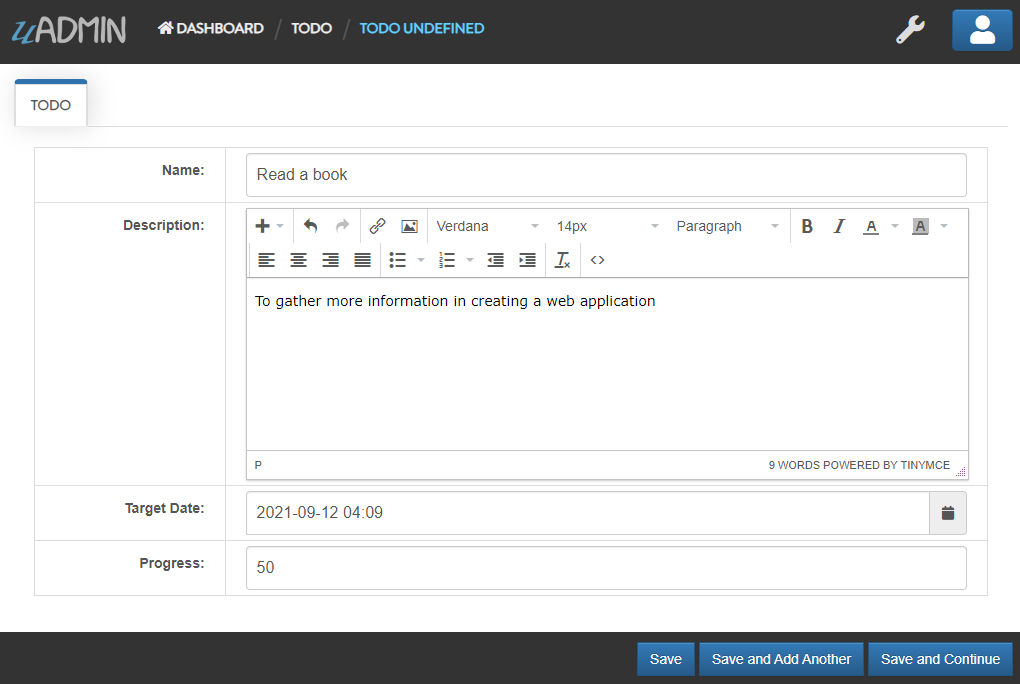
Tada! The progress bar is set to 50% with the blue color as the default one.
If you want to change the color of the progress bar, let’s set a parameter and the value inside the tag. Go back to your main.go again. Let’s say I want to display an orange color between the range of 0 to 100. Add this piece of code after the progress_bar tag: :100:orange (100 is the value and orange is the parameter)
// TODO model ...
type TODO struct {
        uadmin.Model
        Name        string
        Description string `uadmin:"html"`
        TargetDate  time.Time
        Progress    int `uadmin:"progress_bar:100:orange"` // <-- place the tag here
}
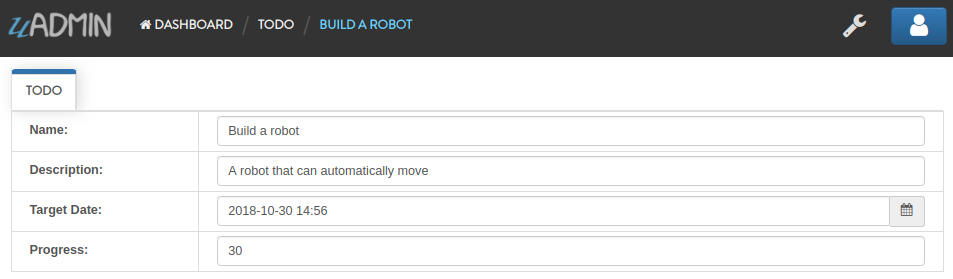
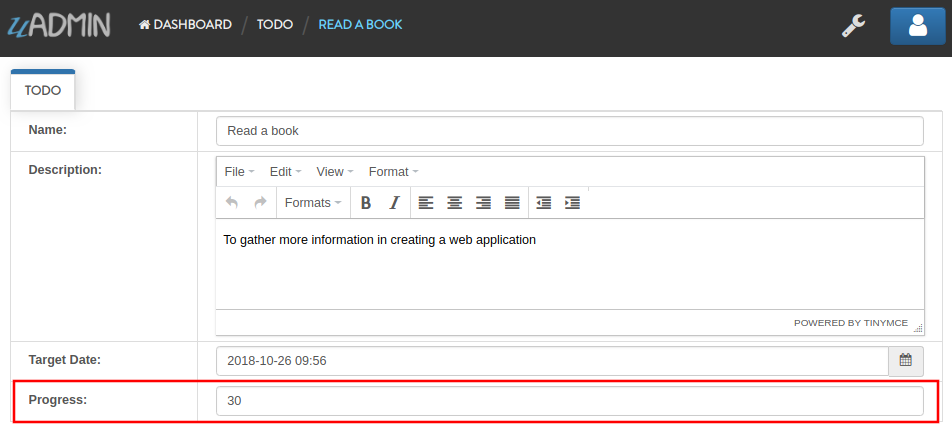
Run your code again, go to the Todos model in the uAdmin dashboard then replace the value of the progress bar to something like 30.

If you want some conditions on your progress bar, let’s set multiple parameters inside the tag. Let’s say I want to display a red color between the range of 0 to 40, yellow color between 41 to 70, and green color between 71 to 100. Add this piece of code after the progress_bar tag: :40:red,70:yellow,100:green
// TODO model ...
type TODO struct {
        uadmin.Model
        Name        string
        Description string `uadmin:"html"`
        TargetDate  time.Time
        Progress    int `uadmin:"progress_bar:40:red,70:yellow,100:green"` // <-- place the tag here
}
Run your code again, go to the Todos model in the uAdmin dashboard then replace the value of the progress bar to something like 20.
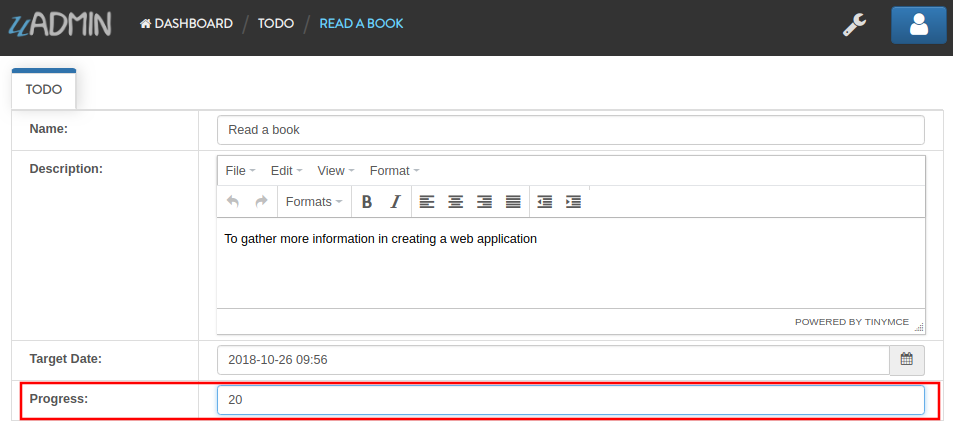

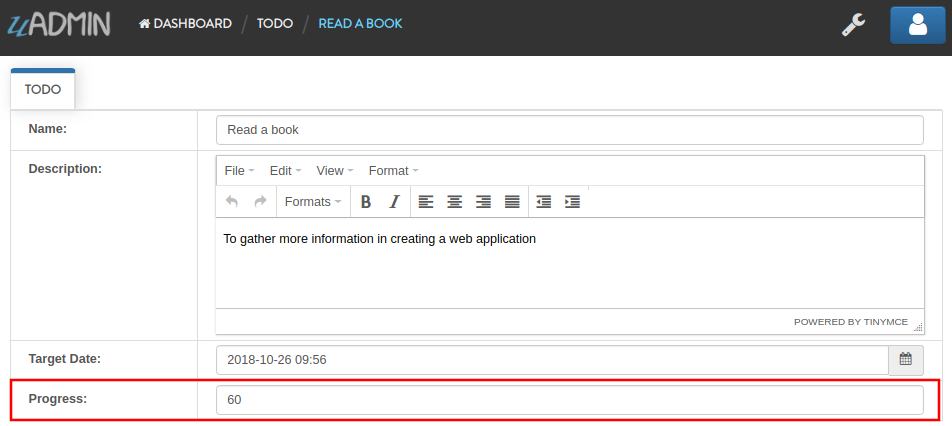
What if I set the value in the progress bar to 60?

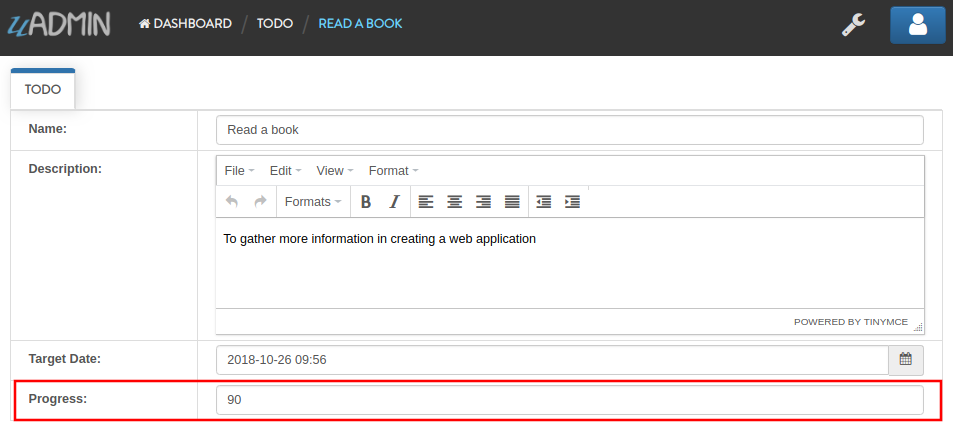
How about 90?

Well done! You have mastered the concepts of creating and modifying the progress bar in the model.
webcam
A feature which adds web can access directly from the image and file fields (Back To Top)
Structure:
`uadmin:"webcam"`
Open your Todo List project, go to friend.go inside the models folder, and apply the following codes below:
// Friend model ...
type Friend struct {
    uadmin.Model
    Name       string

    // Add this field with the type tag of image first followed by the
    // webcam tag to capture a photo in real time
    ProfilePic string `uadmin:"image;webcam"`

    Email      string
    Password   string
}
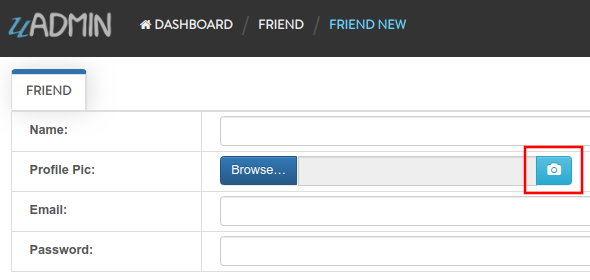
Run your application, go to the Friend model and click Add New Friend button on the top right corner of the screen. As expected, there is a camera tag on the right side of the ProfilePic input field. If you have a webcam installed on your computer, click that icon and see it for yourself.
Reference
| [1] | Rouse, Margaret (2005, April). Tag. Retrieved from https://searchmicroservices.techtarget.com/definition/tag |